There’s something quietly luxurious about mascarpone — its velvety texture, subtle sweetness, and ability to elevate both savory and sweet dishes with a single spoonful. But behind its elegance lies a surprisingly simple process. In this guide, we’ll walk through how to make mascarpone cheese from scratch using just two ingredients and a bit of patience. No cheesecloth, no special cultures — just cream, acid, and intention.
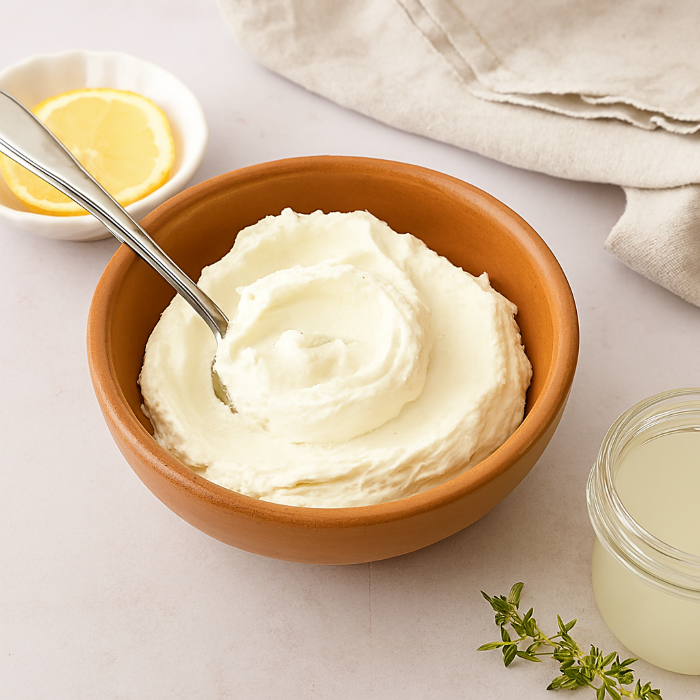
Whether you’re layering it into tiramisu, folding it into pasta, or spooning it over roasted fruit, homemade mascarpone brings a depth and freshness that store-bought versions can’t match. It’s a gentle ritual: heat, stir, strain, and wait. And the reward? A bowl of rich, silky cheese with soft peaks and a clean finish — plus a pale whey that’s perfect for discard baking or gentle ferments.
This recipe is part of a broader rhythm — one that celebrates slow-build dairy rituals, zero-waste kitchen practices, and the quiet joy of making something from scratch. If you’ve ever wondered what mascarpone tastes like when it’s truly fresh, this is your moment. Let’s begin.
The Italian Secret: What Makes Mascarpone So Unique?
Mascarpone is more than just a creamy cheese—it’s a quiet cornerstone of Italian culinary tradition, revered for its velvety texture and subtle, buttery flavor. Unlike aged cheeses that boast sharpness or complexity, mascarpone whispers richness. It’s made not from milk, but from heavy cream, gently coagulated with acid—usually lemon juice or citric acid—then strained to achieve its signature silkiness. This process sets it apart from ricotta, which is typically made from whey, or cream cheese, which often includes stabilizers and cultures.
What makes mascarpone truly unique is its versatility. In desserts like tiramisu, it acts as a luxurious binder, mellowing the bitterness of espresso and the sweetness of sugar. In savory dishes, it folds seamlessly into risottos, pastas, and sauces, adding depth without overpowering. Its high fat content—often around 40%—gives it a mouthfeel that’s closer to whipped cream than traditional cheese, making it ideal for both spoonable indulgence and structural layering.
But mascarpone’s magic isn’t just in its flavor—it’s in its ritual. The act of making it from scratch is a gentle, meditative process: heat, stir, strain, and wait. No rennet, no cultures, no aging. Just cream transformed through patience and intention. This simplicity is the Italian secret—an invitation to slow down, savor, and celebrate the quiet luxury of homemade.
Whether you’re crafting it for a dessert, layering it into a discard-friendly bake, or pairing it with fermented fruit, mascarpone offers a blank canvas for creativity. It’s not just cheese—it’s a texture, a mood, a moment. And once you’ve made it yourself, you’ll understand why Italians have cherished it for centuries.
Why Make Mascarpone at Home?
Making mascarpone at home isn’t just about saving a trip to the store—it’s about reclaiming a quiet ritual in your kitchen. With just two ingredients and a gentle process, you transform cream into something velvety, rich, and deeply satisfying. No additives, no stabilizers, no mystery. Just heat, acid, and intention.
Store-bought mascarpone often comes with a short shelf life, a high price tag, and a texture that varies from brand to brand. Homemade mascarpone, on the other hand, offers consistency, freshness, and control. You decide the thickness, the tang, and the yield. It’s a small act of culinary independence that pays off in flavor and versatility.
From a practical standpoint, making mascarpone at home opens up a world of zero-waste possibilities. The leftover whey can be folded into discard muffins, used to ferment vegetables, or added to soups and broths for a subtle depth. It’s a perfect fit for kitchens that value sustainability and rhythm.
But the real reason to make mascarpone at home? The moment you lift the spoon and see those soft peaks swirl. It’s a texture you created, a mood you shaped. Whether you’re layering it into tiramisu, stirring it into pasta, or pairing it with roasted fruit, homemade mascarpone becomes more than an ingredient—it becomes part of your story.
This guide is your invitation to slow down, savor the process, and discover how simple it is to create something luxurious from scratch. Once you’ve made it yourself, you’ll never look at store-bought the same way again.
Mascarpone vs. Ricotta vs. Labneh:
What’s the Difference?
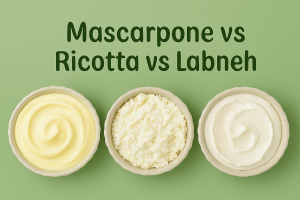
Mascarpone, ricotta, and labneh may all fall under the “soft cheese” umbrella, but their origins, textures, and culinary personalities couldn’t be more distinct. Understanding their differences helps you choose the right one for your dish—or better yet, make them from scratch and savor the ritual.
Mascarpone is Italy’s silken secret. Made from heavy cream and acid (like lemon juice or citric acid), it’s rich, buttery, and spoonable. With a fat content around 40%, it behaves more like whipped cream than cheese. It’s the soul of tiramisu, the velvet in pasta sauces, and a blank canvas for both sweet and savory creations. No cultures, no rennet—just gentle heat and patience.
Ricotta, also Italian, is traditionally made from whey—the leftover liquid from other cheese-making processes. It’s lighter, grainier, and slightly sweet. Homemade ricotta often uses whole milk and acid, resulting in a fluffier, more neutral version. It’s perfect for layering into lasagna, stuffing into ravioli, or folding into discard-friendly bakes.
Labneh, on the other hand, hails from the Levant. It’s made by straining yogurt until it becomes thick and spreadable. Tangy, probiotic-rich, and lower in fat, labneh brings brightness to mezze platters, sandwiches, and dips. It’s the only one of the three that’s fermented, making it ideal for gut-friendly rituals and pairing with fermented vegetables.
In short: mascarpone is indulgent and creamy, ricotta is light and versatile, and labneh is tangy and refreshing. Each offers a unique texture and flavor profile, shaped by its ingredients and process. Whether you’re layering, dipping, or baking, knowing the difference lets you choose with intention—and maybe even make your own.
Essential Ingredients and Tools: Prepping for a Homemade Batch
Before you begin crafting your own mascarpone cheese, it’s worth pausing to gather the essentials—not just ingredients, but the tools that shape the ritual. This isn’t a complicated process, but precision and patience make all the difference.
At the heart of mascarpone is heavy cream—preferably one with a fat content of 36% or higher. Avoid ultra-pasteurized varieties if possible, as they can interfere with curd formation. The second ingredient is acid, typically lemon juice or citric acid. Each brings a slightly different flavor profile: lemon adds brightness, while citric acid keeps things neutral and clean.
As for tools, simplicity reigns. You’ll need a heavy-bottomed saucepan to gently heat the cream without scorching. A thermometer is optional but helpful—aim for a temperature around 185°F (85°C) before adding your acid. A fine mesh strainer or cheesecloth will help you drain the curds, though for mascarpone, even a clean cotton cloth or coffee filter can work. A glass bowl for collecting the whey and a wooden spoon for stirring round out the setup.
Optional but useful: a lid or cover for resting the curds undisturbed, and a scale if you’re batching for consistency or recipe development.
This prep stage is more than logistics—it’s the beginning of a slow-build ritual. Each tool supports the transformation of cream into something luxurious and spoonable. And once you’ve made your first batch, you’ll find yourself reaching for these items again and again—not just for mascarpone, but for ricotta, yogurt, and other dairy rituals.
Ready your space, clear your counter, and let the process unfold. Homemade mascarpone isn’t just a recipe—it’s a rhythm.
First Stage to Make Mascarpone from Scratch
The first stage of making mascarpone from scratch is all about gentle transformation. It begins with selecting the right cream—ideally heavy cream with at least 36% fat, and preferably not ultra-pasteurized. This high-fat content is what gives mascarpone its signature richness and silky texture. Once your cream is ready, the ritual begins.
Pour the cream into a heavy-bottomed saucepan. This helps distribute heat evenly and prevents scorching. Set the pan over low to medium heat and warm the cream slowly, stirring occasionally to avoid hot spots. You’re aiming for a temperature of around 185°F (85°C). A kitchen thermometer is helpful here, but not essential if you’re attuned to the rhythm of the process.
As the cream reaches temperature, it’s time to introduce the acid—either fresh lemon juice or a diluted citric acid solution. Add it gradually, stirring gently. You’ll notice the cream begin to thicken slightly and take on a custard-like consistency. This is the moment of quiet magic: no curds, no dramatic separation, just a subtle shift in texture.
Once the cream has thickened, remove it from the heat and let it rest. This pause allows the acid to fully activate and the cream to settle into its new form. You’ve now completed the first stage—heat, acid, and intention. What follows is straining and patience, but the foundation is set. This stage isn’t just technical; it’s meditative. A slow build toward something luxurious, spoonable, and deeply satisfying.
Step-by-Step Mascarpone Mastery: The Coagulation Process
The coagulation process is the heart of mascarpone mastery—a quiet transformation where cream becomes something spoonable, luxurious, and unmistakably Italian. Once your heavy cream reaches the ideal temperature of around 185°F (85°C), it’s time to introduce the acid. This is where the magic begins.
Add your acid—either fresh lemon juice or a diluted citric acid solution—slowly and gently, stirring with a wooden spoon. You won’t see dramatic curds like in ricotta. Instead, the cream thickens subtly, taking on a custard-like texture. This is a low-drama coagulation: no bubbling, no separation, just a quiet shift in viscosity. The acid denatures the proteins in the cream, encouraging them to bind and form a soft structure without breaking apart.
Once the cream has thickened, remove it from the heat and let it rest undisturbed. This pause is essential—it allows the acid to finish its work and the cream to settle into its new form. Cover the pan loosely and let it sit for 10–15 minutes. You’ll notice the surface firming slightly, a sign that the transformation is complete.
This stage is all about patience and precision. No rushing, no over-stirring. Just heat, acid, and time. It’s a meditative moment in the mascarpone ritual, where simplicity meets intention. Once rested, the mixture is ready to be strained—ushering in the final phase of texture refinement. But here, in coagulation, is where the soul of mascarpone begins.
Draining and Setting: Achieving the Signature Creamy Texture
Draining and setting is where mascarpone earns its signature texture—silky, thick, and spoonable. After the coagulation stage, the mixture needs time to release excess moisture and settle into its final form. This step is less about dramatic separation and more about quiet refinement.
Begin by lining a fine mesh strainer with cheesecloth, a clean cotton cloth, or even a coffee filter. Place it over a bowl to catch the whey. Gently pour the thickened cream into the strainer, being careful not to disturb its delicate structure. You won’t see large curds like in ricotta—mascarpone is subtler, more custard-like.
Cover the top loosely and let it drain in the refrigerator for 8 to 12 hours. This slow, cold rest allows the mascarpone to firm up while retaining its creamy integrity. The longer it drains, the thicker it becomes. For a softer, spreadable version, 6 hours may suffice. For firmer mascarpone ideal for layering or piping, go the full 12.
The whey collected below is pale and mild—perfect for discard baking, broth layering, or gentle ferments. Don’t toss it; it’s part of the ritual.
Once drained, transfer the mascarpone to a clean container. You’ll notice its texture: smooth, rich, and slightly glossy. This is the payoff of patience—a cheese that feels like cream but holds its shape. Homemade mascarpone isn’t just about flavor; it’s about texture, intention, and the quiet satisfaction of crafting something luxurious from scratch.
Storing Your Fresh Cheese: Shelf Life and Preservation Tips
Once your mascarpone is drained and silky, proper storage ensures it stays fresh and spoonable. Transfer it to an airtight container and refrigerate immediately. Homemade mascarpone typically lasts up to 5 days, though its peak texture and flavor shine within the first 3. Because it contains no preservatives, it’s more delicate than store-bought versions—watch for sour notes or separation as signs it’s past its prime.
To preserve its creamy integrity, avoid stirring it repeatedly or exposing it to fluctuating temperatures. Always use a clean spoon to scoop, and keep the lid tightly sealed to prevent moisture loss and fridge odors from seeping in.
Freezing is possible, but not ideal. While mascarpone can be frozen for up to a month, thawing may alter its texture—making it grainier and less smooth. If you do freeze it, use it in baked dishes like muffins or pasta fillings where texture matters less.
For longer shelf life, consider batching smaller portions or pairing it with discard-friendly recipes that use it up quickly. And don’t forget the whey: store it in a separate jar for up to a week, and use it in soups, ferments, or baking.
Mascarpone is a fresh ritual—best enjoyed soon after creation. Treat it like a luxury, and it will reward you in every spoonful.

Troubleshooting Mascarpone: Common Issues and Quick Fixes
Even with its simplicity, mascarpone can surprise you with a few quirks. If your batch turns out too thin, the most common culprit is underheating. The cream must reach around 185°F (85°C) to properly coagulate. Use a thermometer if possible, and stir gently to avoid scorching. If you’ve added acid too early or too quickly, the proteins may not bind correctly—resulting in a runny texture. In this case, try reheating gently and adding a touch more acid.
If your mascarpone tastes overly tangy or metallic, it may be due to too much lemon juice or citric acid. Next time, reduce the acid slightly or switch to a milder option like distilled white vinegar. For a neutral flavor, citric acid in controlled amounts works best.
Grainy or curdled mascarpone usually stems from overheating or rapid acid addition. Stir slowly, and avoid boiling. If the texture feels off after straining, try whisking gently to smooth it out—though it won’t fully recover if the proteins have broken down.
Lastly, if your mascarpone separates after refrigeration, it may have drained too long or been exposed to temperature swings. Stir gently before use, and store in a tightly sealed container.
Each issue is a chance to refine your rhythm. Mascarpone rewards patience, precision, and a light touch.
Beyond Tiramisu: Creative Ways to Use
Your Homemade Mascarpone
Homemade mascarpone is far more versatile than its iconic role in tiramisu. Its creamy texture and neutral flavor make it a quiet powerhouse across sweet, savory, and fermented pairings. Think of it as a blank canvas—ready to absorb, layer, and elevate.
For breakfast rituals, swirl mascarpone into warm oatmeal with roasted figs or spoon it over sourdough pancakes with fermented berry compote. It adds richness without overpowering, and pairs beautifully with tangy or acidic toppings. In savory dishes, fold it into risotto just before serving for a velvety finish, or use it as a base for creamy pasta sauces with lemon zest and herbs.
Mascarpone also shines in discard-friendly bakes. Blend it into muffin batter, layer it into quick breads, or whip it with whey and honey for a soft, spreadable topping. For fermented pairings, try it alongside lacto-fermented carrots or pickled plums—its mildness balances bold flavors.
Hosting? Use mascarpone as a dip base with garlic and olive oil, or layer it into crostini with roasted tomatoes and thyme. It’s also stunning in no-bake cheesecakes, fruit tarts, and mousse-style desserts.
The beauty of homemade mascarpone is its adaptability. Once you’ve made it, you’ll find endless ways to fold it into your kitchen rhythm—always with warmth, intention, and a spoonful of luxury.
Final Thoughts: A Ritual Worth Repeating
Making mascarpone from scratch isn’t just a recipe—it’s a ritual. From heating the cream to watching it thicken, each step invites you to slow down and engage with your ingredients. There’s no rush, no shortcuts, just a quiet rhythm that rewards patience with something truly luxurious.
Unlike store-bought versions, homemade mascarpone carries the warmth of intention. You control the texture, the flavor, and the yield. You decide how it fits into your kitchen cadence—whether folded into pasta, layered into dessert, or paired with fermented fruit. And with each batch, you deepen your understanding of dairy alchemy.
It’s also a gateway. Once you’ve mastered mascarpone, ricotta, labneh, and yogurt feel within reach. You start seeing whey not as waste, but as a resource. You begin layering textures, flavors, and stories into your cooking. This isn’t just about cheese—it’s about reclaiming process, building trust with your ingredients, and anchoring your kitchen in ritual.
So repeat it. Refine it. Let mascarpone become part of your rhythm. Because once you’ve tasted the difference, you’ll never go back.